About BruteSpray: BruteSpray takes nmap GNMAP/XML output or newline seperated JSONS and automatically brute-forces services with default credentials using Medusa. BruteSpray can even find non-standard ports by using the -sV inside Nmap.
BruteSpay's Installation
With Debian users, the only thing you need to do is this command: sudo apt install brutespray
For Arch Linux user, you must install Medusa first: sudo pacman -S medusa And then, enter these commands to install BruteSpray: Supported Services: ssh, ftp, telnet, vnc, mssql, mysql, postgresql, rsh, imap, nntpp, canywhere, pop3, rexec, rlogin, smbnt, smtp, svn, vmauthdv, snmp. How to use BruteSpray?
First do an Nmap scan with -oG nmap.gnmap or -oX nmap.xml. Command: python3 brutespray.py -h Command: python3 brutespray.py --file nmap.gnmap Command: python3 brutesrpay.py --file nmap.xml Command: python3 brutespray.py --file nmap.xml -i You can watch more details here:
Examples
Using Custom Wordlists: python3 brutespray.py --file nmap.gnmap -U /usr/share/wordlist/user.txt -P /usr/share/wordlist/pass.txt --threads 5 --hosts 5 Brute-Forcing Specific Services: python3 brutespray.py --file nmap.gnmap --service ftp,ssh,telnet --threads 5 --hosts 5 Specific Credentials: python3 brutespray.py --file nmap.gnmap -u admin -p password --threads 5 --hosts 5 Continue After Success: python3 brutespray.py --file nmap.gnmap --threads 5 --hosts 5 -c Use Nmap XML Output: python3 brutespray.py --file nmap.xml --threads 5 --hosts 5 Use JSON Output: python3 brutespray.py --file out.json --threads 5 --hosts 5 Interactive Mode:python3 brutespray.py --file nmap.xml -i Data Specs {"host":"127.0.0.1","port":"3306","service":"mysql"} {"host":"127.0.0.10","port":"3306","service":"mysql"} ... Changelog:Changelog notes are available at CHANGELOG.md.
"W3AF is a Web Application Attack and Audit Framework. The project goal is to create a framework to find and exploit web application vulnerabilities that is easy to use and extend. This project is currently hosted at SourceForge." read more...
Recovering data from a backup should be an easy thing to do. At least this is what you expect. Yesterday I had a problem which should have been easy to solve, but it was not. I hope this blog post can help others who face the same problem.
The problem
1. I had an encrypted Time Machine backup which was not used for months 2. This backup was not on an official Apple Time Capsule or on a USB HDD, but on a WD MyCloud NAS 3. I needed files from this backup 4. After running out of time I only had SSH access to the macOS, no GUI
The struggle
By default, Time Machine is one of the best and easiest backup solution I have seen. As long as you stick to the default use case, where you have one active backup disk, life is pink and happy. But this was not my case.
As always, I started to Google what shall I do. One of the first options recommended that I add the backup disk to Time Machine, and it will automagically show the backup snapshots from the old backup. Instead of this, it did not show the old snapshots but started to create a new backup. Panic button has been pressed, backup canceled, back to Google.
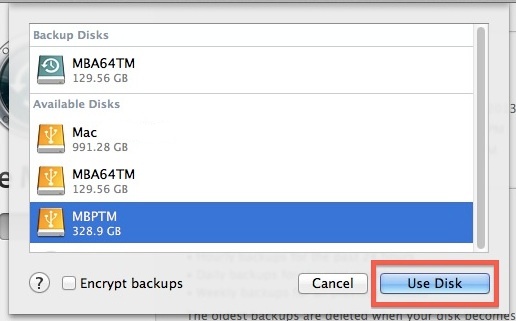
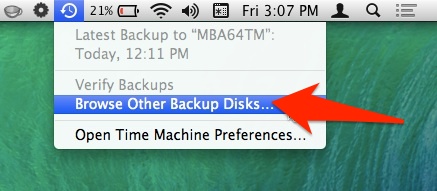
Other tutorials recommend to click on the Time Machine icon and pressing alt (Option) key, where I can choose "Browse other backup disks". But this did not list the old Time Machine backup. It did list the backup when selecting disks in Time Machine preferences, but I already tried and failed that way.
YAT (yet another tutorial) recommended to SSH into the NAS, and browse the backup disk, as it is just a simple directory where I can see all the files. But all the files inside where just a bunch of nonsense, no real directory structure.
YAT (yet another tutorial) recommended that I can just easily browse the content of the backup from the Finder by double-clicking on the sparse bundle file. After clicking on it, I can see the disk image on the left part of the Finder, attached as a new disk. Well, this is true, but because of some bug, when you connect to the Time Capsule, you don't see the sparse bundle file. And I got inconsistent results, for the WD NAS, double-clicking on the sparse bundle did nothing. For the Time Capsule, it did work. At this point, I had to leave the location where the backup was present, and I only had remote SSH access. You know, if you can't solve a problem, let's complicate things by restrict yourself in solutions. Finally, I tried to check out some data forensics blogs, and besides some expensive tools, I could find the solution.
The solution
Finally, a blog post provided the real solution - hdiutil. The best part of hdiutil is that you can provide the read-only flag to it. This can be very awesome when it comes to forensics acquisition.
Note: if you receive the error "resource temporarily unavailable", probably another machine is backing up to the device
And now, you can find your backup disk under /Volumes. Happy restoring!
Probably it would have been quicker to either enable the remote GUI, or to physically travel to the system and login locally, but that would spoil the fun.
It just a silly python script that either retrieves SSL Certificate based data from online sources, currently https://crt.sh/, https://certdb.com/, https://sslmate.com/certspotter/, and https://censys.io or given an IP range it will attempt to extract host information from SSL Certificates. If you want to use Censys.io you need to register for an API key.
How to install
git clone https://github.com/joda32/CertCrunchy.git
cd CertCrunchy
sudo pip3 install -r requirements.txt
How to use it? Very simply -d to get hostnames for a specific domain -D to get hostnames for a list of domains (just stuff it in a line-delimited text file) -I to retrieve and parse certificates from hosts in a netblock / IP range (e.g. 192.168.0.0/24) -T the thread count makes stuff faster, but don't over do it -o Output file name -f Output format CSV or JSON, CSV is the default for the rest, I'm still working on those :) API keys and configs All API keys are stored in the api_keys.py file below is a list of supported APIs requiring API keys.
In part 1 and 2 we covered re-entrancy and authorization attack scenarios within the Ethereum smart contract environment. In this blog we will cover integer attacks against blockchain decentralized applications (DAPs) coded in Solidity.
Integer Attack Explanation:
An integer overflow and underflow happens when a check on a value is used with an unsigned integer, which either adds or subtracts beyond the limits the variable can hold. If you remember back to your computer science class each variable type can hold up to a certain value length. You will also remember some variable types only hold positive numbers while others hold positive and negative numbers.
If you go outside of the constraints of the number type you are using it may handle things in different ways such as an error condition or perhaps cutting the number off at the maximum or minimum value.
In the Solidity language for Ethereum when we reach values past what our variable can hold it in turn wraps back around to a number it understands. So for example if we have a variable that can only hold a 2 digit number when we hit 99 and go past it, we will end up with 00. Inversely if we had 00 and we subtracted 1 we would end up with 99.
Normally in your math class the following would be true:
99 + 1 = 100 00 - 1 = -1
In solidity with unsigned numbers the following is true: 99 + 1 = 00 00 - 1 = 99
So the issue lies with the assumption that a number will fail or provide a correct value in mathematical calculations when indeed it does not. So comparing a variable with a require statement is not sufficiently accurate after performing a mathematical operation that does not check for safe values.
That comparison may very well be comparing the output of an over/under flowed value and be completely meaningless. The Require statement may return true, but not based on the actual intended mathematical value. This in turn will lead to an action performed which is beneficial to the attacker for example checking a low value required for a funds validation but then receiving a very high value sent to the attacker after the initial check. Lets go through a few examples.
Simple Example:
Lets say we have the following Require check as an example: require(balance - withdraw_amount > 0) ;
Now the above statement seems reasonable, if the users balance minus the withdrawal amount is less than 0 then obviously they don't have the money for this transaction correct?
This transaction should fail and produce an error because not enough funds are held within the account for the transaction. But what if we have 5 dollars and we withdraw 6 dollars using the scenario above where we can hold 2 digits with an unsigned integer?
Let's do some math. 5 - 6 = 99
Last I checked 99 is greater than 0 which poses an interesting problem. Our check says we are good to go, but our account balance isn't large enough to cover the transaction. The check will pass because the underflow creates the wrong value which is greater than 0 and more funds then the user has will be transferred out of the account.
Because the following math returns true: require(99 > 0)
Withdraw Function Vulnerable to an UnderFlow:
The below example snippet of code illustrates a withdraw function with an underflow vulnerability:
In this example the require line checks that the balance is greater then 0 after subtracting the _amount but if the _amount is greater than the balance it will underflow to a value above 0 even though it should fail with a negative number as its true value.
require(balances[msg.sender] - _amount > 0);
It will then send the value of the _amount variable to the recipient without any further checks:
msg.sender.transfer(_amount);
Followed by possibly increasing the value of the senders account with an underflow condition even though it should have been reduced:
balances[msg.sender] -= _amount;
Depending how the Require check and transfer functions are coded the attacker may not lose any funds at all but be able to transfer out large sums of money to other accounts under his control simply by underflowing the require statements which checks the account balance before transferring funds each time.
Transfer Function Vulnerable to a Batch Overflow:
Overflow conditions often happen in situations where you are sending a batched amount of values to recipients. If you are doing an airdrop and have 200 users who are each receiving a large sum of tokens but you check the total sum of all users tokens against the total funds it may trigger an overflow. The logic would compare a smaller value to the total tokens and think you have enough to cover the transaction for example if your integer can only hold 5 digits in length or 00,000 what would happen in the below scenario?
You have 10,000 tokens in your account You are sending 200 users 499 tokens each Your total sent is 200*499 or 99,800
The above scenario would fail as it should since we have 10,000 tokens and want to send a total of 99,800. But what if we send 500 tokens each? Lets do some more math and see how that changes the outcome.
You have 10,000 tokens in your account You are sending 200 users 500 tokens each Your total sent is 200*500 or 100,000 New total is actually 0
This new scenario produces a total that is actually 0 even though each users amount is 500 tokens which may cause issues if a require statement is not handled with safe functions which stop an overflow of a require statement.
Lets take our new numbers and plug them into the below code and see what happens:
1: The total variable is 100,000 which becomes 0 due to the 5 digit limit overflow when a 6th digit is hit at 99,999 + 1 = 0. So total now becomes 0.
2: This line checks if the users balance is high enough to cover the total value to be sent which in this case is 0 so 10,000 is more then enough to cover a 0 total and this check passes due to the overflow.
3: This line deducts the total from the senders balance which does nothing since the total of 10,000 - 0 is 10,000. The sender has lost no funds.
4-5: This loop iterates over the 200 users who each get 500 tokens and updates the balances of each user individually using the real value of 500 as this does not trigger an overflow condition. Thus sending out 100,000 tokens without reducing the senders balance or triggering an error due to lack of funds. Essentially creating tokens out of thin air.
In this scenario the user retained all of their tokens but was able to distribute 100k tokens across 200 users regardless if they had the proper funds to do so.
Lab Follow Along Time:
We went through what might have been an overwhelming amount of concepts in this chapter regarding over/underflow scenarios now lets do an example lab in the video below to illustrate this point and get a little hands on experience reviewing, writing and exploiting smart contracts. Also note in the blockchain youtube playlist we cover the same concepts from above if you need to hear them rather then read them.
For this lab we will use the Remix browser environment with the current solidity version as of this writing 0.5.12. You can easily adjust the compiler version on Remix to this version as versions update and change frequently. https://remix.ethereum.org/
Below is a video going through coding your own vulnerable smart contract, the video following that goes through exploiting the code you create and the videos prior to that cover the concepts we covered above:
This next video walks through exploiting the code above, preferably hand coded by you into the remix environment. As the best way to learn is to code it yourself and understand each piece:
Conclusion:
We covered a lot of information at this point and the video series playlist associated with this blog series has additional information and walk throughs. Also other videos as always will be added to this playlist including fixing integer overflows in the code and attacking an actual live Decentralized Blockchain Application. So check out those videos as they are dropped and the current ones, sit back and watch and re-enforce the concepts you learned in this blog and in the previous lab. This is an example from a full set of labs as part of a more comprehensive exploitation course we have been working on.
We had an overwhelming turnout out of submissions for Call for Papers and Call for Training for the OWASP Global AppSec DC 2019 (formerly AppSec USA) We want to give each submission the time deserved to evaluate each before choosing. Keeping that in mind the notifications of acceptance and thanks will be CHANGED to July 1, 2019. We appreciate your understanding and patience in this matter.
"fragroute intercepts, modifies, and rewrites egress traffic destined for a specified host, implementing most of the attacks described in the Secure Networks "Insertion, Evasion, and Denial of Service: Eluding Network Intrusion Detection" paper of January 1998. It features a simple ruleset language to delay, duplicate, drop, fragment, overlap, print, reorder, segment, source-route, or otherwise monkey with all outbound packets destined for a target host, with minimal support for randomized or probabilistic behaviour. This tool was written in good faith to aid in the testing of network intrusion detection systems, firewalls, and basic TCP/IP stack behaviour." read more...
Are you tired of reading endless news stories about ethical hacking and not really knowing what that means? Let's change that!
This Post is for the people that:
Have No Experience With Cybersecurity (Ethical Hacking)
Have Limited Experience.
Those That Just Can't Get A Break
OK, let's dive into the post and suggest some ways that you can get ahead in Cybersecurity.
I receive many messages on how to become a hacker. "I'm a beginner in hacking, how should I start?" or "I want to be able to hack my friend's Facebook account" are some of the more frequent queries. Hacking is a skill. And you must remember that if you want to learn hacking solely for the fun of hacking into your friend's Facebook account or email, things will not work out for you. You should decide to learn hacking because of your fascination for technology and your desire to be an expert in computer systems. Its time to change the color of your hat 😀
I've had my good share of Hats. Black, white or sometimes a blackish shade of grey. The darker it gets, the more fun you have.
If you have no experience don't worry. We ALL had to start somewhere, and we ALL needed help to get where we are today. No one is an island and no one is born with all the necessary skills. Period.OK, so you have zero experience and limited skills…my advice in this instance is that you teach yourself some absolute fundamentals.
Let's get this party started.
What is hacking?
Hacking is identifying weakness and vulnerabilities of some system and gaining access with it.
Hacker gets unauthorized access by targeting system while ethical hacker have an official permission in a lawful and legitimate manner to assess the security posture of a target system(s)
There's some types of hackers, a bit of "terminology". White hat — ethical hacker. Black hat — classical hacker, get unauthorized access. Grey hat — person who gets unauthorized access but reveals the weaknesses to the company. Script kiddie — person with no technical skills just used pre-made tools. Hacktivist — person who hacks for some idea and leaves some messages. For example strike against copyright.
Linux is a command line interface and has a graphical interface as well. But the only thing we should know how we interact with Linux tools and applications with the help of command line. This is the basic thing of Linux. As you can do things manually by simple clicking over the programs just like windows to open an applications. But if you don't have any idea about commands of Linux and definitely you also don't know about the Linux terminal. You cannot explore Linux deeply. Because terminal is the brain of the Linux and you can do everything by using Linux terminal in any Linux distribution. So, if you wanna work over the Linux distro then you should know about the commands as well. In this blog you will get a content about commands of Linux which are collectively related to the system users. That means if you wanna know any kind of information about the users of the system like username passwords and many more.
id
The "id" command is used in Linux operating system for the sake of getting knowledge about active user id with login and group. There may be different users and you wanna get a particular id of the user who is active at that time so for this you just have to type this command over the terminal.
last
The "last" command is used in Linux operating system to show the information about the last logins on the system. If you forget by which user id you have logged in at last time. So for this information you can search login detail by using this command.
who
The "who" command is used in Linux distributions to display the information about the current user which a an active profile over the Linux operating system. If you are in the system and you don't know about that active user and suddenly you have to know about that user detail so you can get the info by using this command.
groupadd
The "groupadd admin" is the command which is used in Linux operating system to add a group in the Linux system to gave the privileges to that group.
useradd
The "useradd" command is used in Linux operating system to add user or users to a specific group. If you wanna add a user name Umer so for this matter you just have to write a command i.e. useradd -c "Umer".
userdel
The "userdel" command is used in Linux operating system for the purpose to delete any user or users from the particular group present in the linux operating system. For example "userdel Umer" this command will delete the user named Umer.
adduser
The "adduser" command is a simple command used to create directly any user in the system. There is no need to make a group for this. You just have to type the command with user name like adduser Umer, it will created a user by name Umer.
usermod
The "usermod" is a command used in Linux operating system to modify the information of any particular user. You can edit or delete information of any particular user in the Linux operating system.
"dsniff is a collection of tools for network auditing and penetration testing. dsniff, filesnarf, mailsnarf, msgsnarf, urlsnarf, and webspy passively monitor a network for interesting data (passwords, e-mail, files, etc.). arpspoof, dnsspoof, and macof facilitate the interception of network traffic normally unavailable to an attacker (e.g, due to layer-2 switching). sshmitm and webmitm implement active monkey-in-the-middle attacks against redirected SSH and HTTPS sessions by exploiting weak bindings in ad-hoc PKI." read more...
Example of exploiting a single webcam entropy -b 1 -i [webcam's ip address and port] -v Example: entropy -b 1 -i 192.168.1.100:80 -v
Example of exploiting webcams from a list entropy -b 2 -l [file text] -v Example: entropy -b 2 -l iplist.txt -v
Example of exploiting webcams using shodan entropy -b 2 -v --shodan [you shodan api key] Example: entropy -b 2 -v --shodan PSKINdQe1GyxGgecYz2191H2JoS9qvgD
Entropy Toolkit disclaimer: Usage of the Entropy Toolkit for attacking targets without prior mutual consent is illegal. It is the end user's responsibility to obey all applicable local, state, federal, and international laws. Developers assume no liability and are not responsible for any misuse or damage caused by this program. Entropy Toolkit license:MIT license.
The OWASP Foundation has selected the technical writer for Google Season of Docs by Fabio Cerullo
The OWASP Foundation has been accepted as the organization for the Google Seasons of Docs, a project whose goals are to give technical writers an opportunity to gain experience in contributing to open source projects and to give open-source projects an opportunity to engage the technical writing community.
During the program, technical writers spend a few months working closely with an open-source community. They bring their technical writing expertise to the project's documentation, and at the same time learn about open source and new technologies.
The open-source projects work with the technical writers to improve the project's documentation and processes. Together they may choose to build a new documentation set, or redesign the existing docs, or improve and document the open-source community's contribution procedures and onboarding experience. Together, we raise public awareness of open source docs, of technical writing, and of how we can work together to the benefit of the global open source community.
After a careful review and selection process, the OWASP Foundation has picked the primary technical writer who will work along the OWASP ZAP Team for the next 3 months to create the API documentation of this flagship project.
Congratulations to Nirojan Selvanathan!
Please refer to the linked document where you could look at the deliverables and work execution plan.
About IoT-Implant-Toolkit IoT-Implant-Toolkit is a framework of useful tools for malware implantation research of IoT devices. It is a toolkit consisted of essential software tools on firmware modification, serial port debugging, software analysis and stable spy clients. With an easy-to-use and extensible shell-like environment, IoT-Implant-Toolkit is a one-stop-shop toolkit simplifies complex procedure of IoT malware implantation. In MarvelTeamLab's research, they have succcessfully implanted Trojans in eight devices including smart speakers, cameras, driving recorders and mobile translators with IoT-Implant-Toolkit. A demo GIF below:
IoT-Implant-Toolkit's Installation Your must install ffmpeg and sox first:
For Debian-based distro users: sudo apt install sox ffmpeg
For Arch Linux-based user: sudo pacman -S sox ffmpeg
Then, open your Terminal and enter these commands:
Usage Three commands supported:
list: list all plugins.
run: run a specific plugin with "run [plugin] [parameters]".
Hacking is an attempt to exploit a computer system vulnerabilities or a private network inside a computer to gain unauthorized acess. Hacking is identifying and exploiting weakness in computer system and/ or computer networks for finding the vulnerability and loopholes.
Sé que a muchos les ha pasado que cuando encienden sus equipos nuestro sistema operativo no arranca, solo podemos ver una pantalla con errores extremos los cuales puede traer serios problemas. Pero que en realidad no hay de qué preocuparnos simplemente porque tenemos a la mano la solución y en este post queremos brindar el mejor recurso para que puedas entrar al sistema operativo y salvar toda la información, de esta manera nos evitamos tener que formatear nuestro PC y perder absolutamente todo.
Para ello vamos a utilizar un disco de rescate del sistema de Windows, que como muchos conocen es un dominio de recuperación de arranque los cuales ofrecen múltiples herramientas que brindan solución a problemas ocasionados por un registro de impulso maestro (MBR) un excelente apoyo de hardware y software que carece para reparar tu sistema.
Esta técnica se basa en poder ingresar de manera bruta al sistema operativo y desde ahí poder rescatar todos los archivos importantes, de la misma forma dar reparación rápida sin acudir a otros procedimientos más complejos. Es una herramienta poderosa que todo ingeniero de sistema conoce pero que en ningún momento es revelada.
Ya con este procedimiento podemos dar soluciones a problemas de virus, errores en el sistema operativo y hasta la recuperación de ficheros cuando Windows se niega a iniciar, son muchas las funciones que nos ofrece este software que si lo utilizamos de la mejor forma podemos hacer grandes cosas con beneficio a nuestro sistema operativo.
¿Cómo funciona?
Se necesita una imagen iSO del software Gandalf´s y el programa Rufus para poder crear una memoria USB boteable y para ello simplemente damos clic a los siguientes enlaces.
Paso 1- Abrimos Rufu y con la memoria en el PC seleccionamos la imagen iSO de Gandalfs y damos empezar, seguido nos saldrá un mensaje diciendo que todos los datos serán eliminados, damos en aceptar y automáticamente se empieza a crear la memoria USB boteable. (Imagen de ejemplo)
Paso 2- Reiniciamos nuestro ordenador y presionamos la tecla F9 para ingresar a la BIOS. Es importante saber el modelo de nuestra PC ya que todos los comando para bootear la BIOS son diferentes. Las más habituales para ingresar son:SUPR, ESC y F2, aunque las más populares suelen serSUPR o DELen Inglés.
Paso 3- Ya en la BIOS, seleccionamos nuestra memoria USB para que cargue y empiece a ejecutar Gandalf´s Windows 10 pe x64
Con estos simples pasos ya podemos rescatar todos nuestros archivos y a la vez buscar la manera de dar solución al arranque de Windows optando por utilizar todas la herramientas que nos ofrece el programa, son muchas funciones que nos van ayudar a reparar nuestro equipo, solo queda explorar un poco por la interfaz y darle el mejor uso logrando conseguir buenos resultados. También te puede interesar:(Cómo reparar memorias USB desde CMD sin formatear)